|
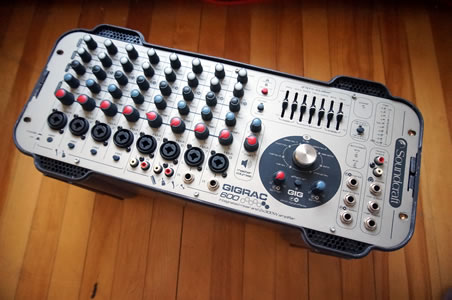
Soundcraft GigRac 600
This review is for educational purposes only. Under no circumstances must repairs be attempted on the GigRac 600 unless by a qualified technician. Disassembly is DANGEROUS as some components are at MAINS voltages.
AmpsLab/Michael Chua takes no responsibility for any loss, injury or death howsoever caused resulting from, whether directly or indirectly, the reader’s inability to understand and appreciate the hazards of household MAINS or other voltages.
In this review, I will be examining the finer points in the electronic engineering that goes into the GigRac 600. I will start off with the MAINS input PCB. This is where the MAINS power cable is connected to.
InRush Current Limiting
 Fig 1 – Mains Input PC Board Fig 1 – Mains Input PC Board
The PC Board in Fig 1 contains three sections. The components enclosed by the thick white line (top right corner) are for InRush Current Limiting. After that is the Power Supply Section (lower half). Lastly, the top left half is where the two power amplifiers are connected to the loudspeakers by Speakons and 1/4″ phone jacks. Of these three, it is the InRush Current Limiting section that deserves a deeper look. The other two are quite standard items.
InRush Current Schematic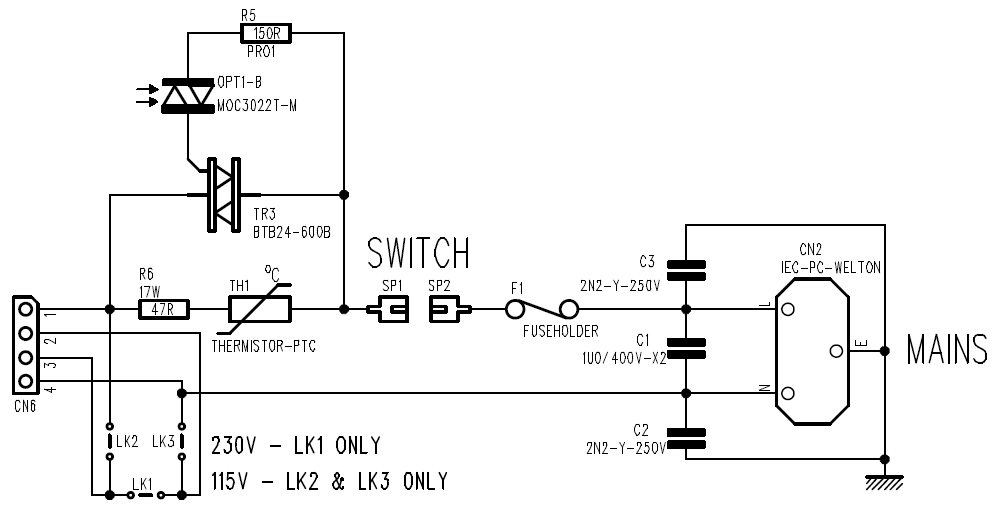
Fig 2 – InRush Current Limiter Circuit
Fig 2 is the schematic of the Current Limiting section. When the GigRac 600 is switched on, LIVE Current (L) from the MAINS flows through the FUSE (F1), through the SWITCH and then through TH1 and a 47Ω/17W resistor. These two components, TH1 and 47Ω, limit the incoming current. Without them, the power supply, namely the power transformer and filter capacitors, will draw very high current when the GigRac 600 is powered up. This will in turn blow the fuse (F1).
A split second after switching on, a Triac (BTB24-600B) is activated. Current then flows through the Triac, bypassing TH1 and the 47Ω resistor in the process. A special optocoupler, a MOC3022, is used to control the operation of the Triac.
Most current limiting circuits use only one resistor but in the GigRac 600, there are two – a 47Ω resistor as the main current limiter and TH1. This is a nice touch. Consider what happens when the GigRac 600 suffers from a major fault, like blown power transistors in the power amplifiers. The GigRac 600 will draw high current instantly.
To protect itself, the Triac (TR3) is automatically shuts off. MAINS Current is then forced through TH1 and the 47Ω resistor. This will reduce the amount of MAINS Current going into the GigRac 600. As current flows though TH1, it will heat up. Since TH1 is a PTC (Positive Thermal Coefficient) thermistor, it’s resistance will increase with temperature. In other words, the hotter it gets, the higher the resistance. This high resistance will further reduce the amount of Mains Current from entering the GigRac 600. The end result is No Smoke, No Fire.
The next item on the agenda is the power amplifier itself.
Power Amplifier Module
 Fig 3 – GigRac 600 Power Amplifier Module Fig 3 – GigRac 600 Power Amplifier Module
The GigRac 600 power amplifier module is exceptionally well laid out (Fig 3). There are two banks of four TO-3 power transistors, one for each channel. On the extreme right, where the three TO-220 transistors are, reside the +/- 15V voltage regulators.
 Fig 4 – GigRac 600 Heatsink. Fig 4 – GigRac 600 Heatsink.
The GigRac 600 is blessed with a decently sized heatsink (Fig 4) to cool the power transistors. A fan is used to extract the heat away. If purely by convection, the heatsink will be much larger. An added bonus is the fan is very silent. This will be much appreciated by musicians.
The small TO-92 black transistor (TR33) seen protruding out of the heatsink is the thermal controller that is part of the biasing circuit. Without this, the power transistors will soon overheat and self-destruct due to a phenomenon called Thermal Runaway.
300Watts/4Ω Power Amplifier Schematic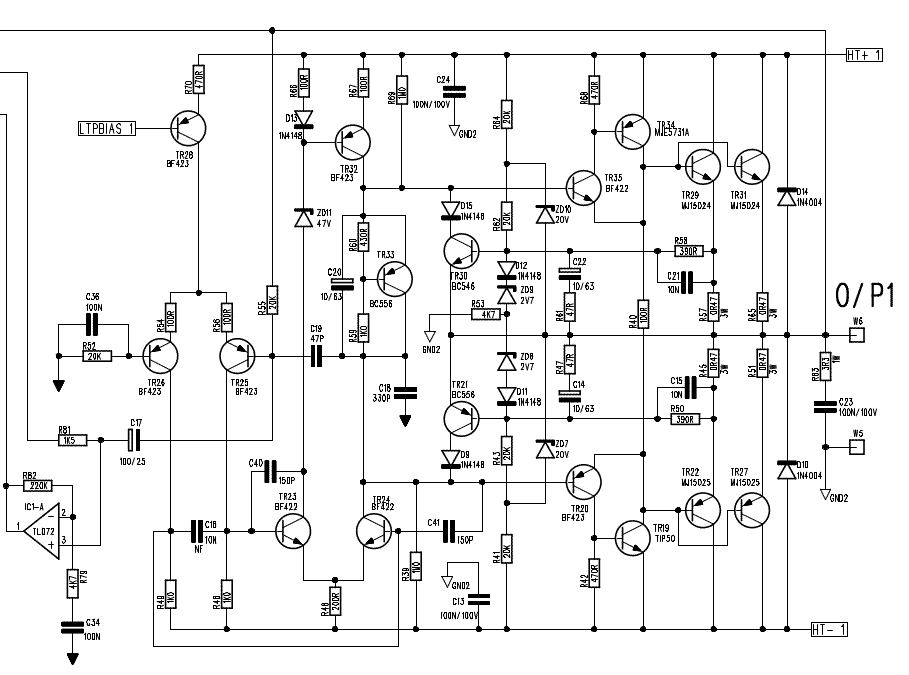
Fig 5 – GigRac 600 Power Amplifier Schematic
The power amplifier schematic in Fig 5 reveals some interesting ideas. Unlike most power amplifiers, the signal from the mixer enters the Inverting Input (TR25) of the 1st stage differential. The signal is further amplified in the 2nd stage by another differential (TR23, TR24). A Sziklai pair (TR35, TR34) then drives the output power transistors (TR29, TR31).
Generally, a Darlington is used in the driver stage when super-beta is required. In the GigRac 600, the designer opted for Sziklai instead. Sziklai offers some benefits over Darlington as they are less prone to thermal runaway. Furthermore, Sziklai is more tolerant of pnp-npn mismatches when they are used in push-pull fashion.
Power Amplifier Protection Schematic
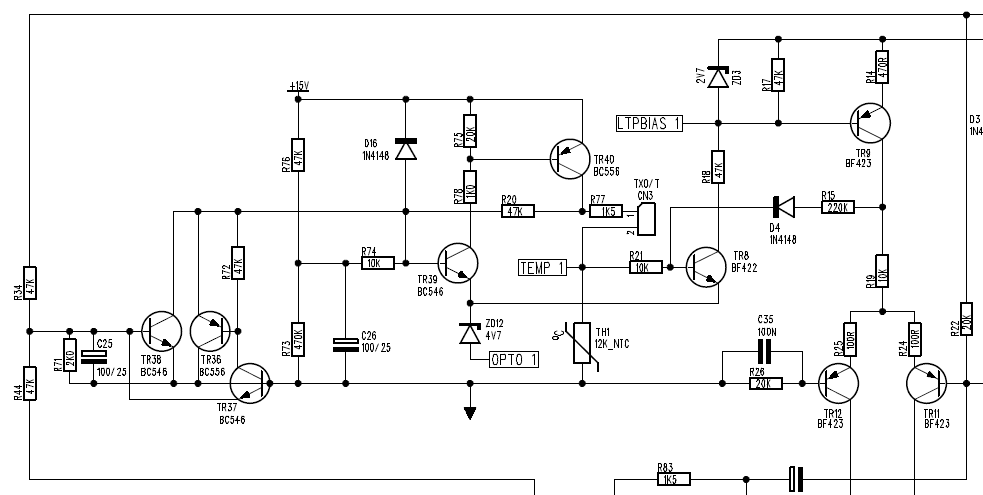 Fig 6 – Power Amplifier Protection Circuitry Fig 6 – Power Amplifier Protection Circuitry
Fig 6 is the schematic of the GigRac 600 Protection. Transistor TR39 controls the LED of the MOC3022. On power up, it delays switching on the Triac for InRush Current Limiting. In the event of power amplifier failure, sensing transistors TR36, TR37 and TR38 shut off TR39 which in turn switches off the Triac.
TH1 is a 12kΩ NTC thermistor that is used to sense the temperature of the heatsink. When the heatsink gets hot, the power of the amplifier is automatically lowered. It does this by reducing the biasing current in the input differential pair. This is quite seamless. It’s a bit like using a compressor. The difference is with a compressor, the line signal is lowered whereas over here, it is through the amplifier gain structure.
When the heatsink gets too hot, TH1 shuts down the amplifier completely. The common method for Over Temperature Protection is to use a bimetal thermal circuit breaker on the heatsink. However, thermal circuit breaker can fail over time. Perhaps the designer deemed a non-mechanical solution is more reliable.
My Thoughts on the GigRac 600
I am impressed with the GigRac 600. It is well designed electronically and the modules within are easy to disassemble. The PCBs are laid out thoughtfully, making repairs much easier.
Sound wise, you can’t go wrong with a Soundcraft. This brand exudes quality. |